每一个 node 的返回值都是整个 state 的子集。也就是说每个 node 都可以改变整个状态。
然后 langgraph 会按照 state 的定义, partial update 整个状态,如果定义的字段是累加的,那么就会加起来,否则就是覆盖的。
后记:现在有了 LLM,确实不用写很多博文了,问 AI 就好
每一个 node 的返回值都是整个 state 的子集。也就是说每个 node 都可以改变整个状态。
然后 langgraph 会按照 state 的定义, partial update 整个状态,如果定义的字段是累加的,那么就会加起来,否则就是覆盖的。
后记:现在有了 LLM,确实不用写很多博文了,问 AI 就好
docker 用久了,难免会占用很多空间,有时候不知道是怎么占用的,就几十几百G了。
要怎么找到是什么东西占用的?运行
docker system df
会返回像
TYPE            TOTAL     ACTIVE    SIZE      RECLAIMABLE
Images          59        8         83.21GB   77.55GB (93%)
Containers      9         8         2.344GB   0B (0%)
Local Volumes   1         1         0B        0B
Build Cache     10        0         6.38GB    5.47GB
这样的结果。我们就可以发现是 image 和 build cache 在疯狂占用空间。
对于 images,可以通过以下办法来删除:
1. 删除悬空镜像 (未被任何镜像引用的中间层)
docker image prune
2. 删除所有未被容器使用的镜像 (包括未被标记和未被容器引用的镜像)
docker image prune -a
而 build cache,可以这样清理:
docker builder prune
后记:最近很少更新博文,我感觉最大的原因是大语言模型的普及。很多类似的技术问题,问 LLM 都能有比较好的答案,不用去阅读一些低质量的文章踩坑了。
FastAPI 经常号称是非常快的框架,因为它大量使用 async。对于一些 IO 密集型的任务,是有一些坑要处理的,不然整个 async 就被堵住了。这个处理还是比较简单的,按官网文档的说法,
如果你的应用程序不需要与其他任何东西通信而等待其响应,请使用
async def
如果你不清楚,使用def就好
那如果是 CPU 密集型的任务呢?这是工作中同事遇到的问题。
用def的办法就不行了——会把线程池堵住。
下面 4 种写法,有 2 种都可以解决这个问题,都是进程池的方案。
from concurrent.futures import ProcessPoolExecutor
import asyncio
import time

from fastapi import FastAPI
import uvicorn


app = FastAPI()

def fib(n: int) -> int:
    if n == 1 or n == 2:
        return 1
    return fib(n-1) + fib(n-2)

def some_cpu_work() -> int:
    return fib(36)  # 大概1s


# 通用配置:20个并发,同时请求

@app.get("/test1")
async def test1():
    """ async定义+直接计算    排队 27s  CPU占用1核心 """
    data = some_cpu_work()
    print(data)
    return data

@app.get("/test2")
def test2():
    """ 普通定义+直接计算      自带线程池 依然27s  CPU占用1核心 """
    data = some_cpu_work()
    print(data)
    return data

#################################### 开一个进程池
process_pool_executor = ProcessPoolExecutor(max_workers=4)

@app.get("/test3")
def test3():
    """ 普通定义+进程池   8s CPU占用4核心   """
    task = process_pool_executor.submit(some_cpu_work)
    data = task.result()
    print(data)
    return data

@app.get("/test4")
async def test4():
    """ async定义+交给进程池  8s CPU占用4核心  """
    data = await asyncio.get_running_loop().run_in_executor(process_pool_executor, some_cpu_work)
    print(data)
    return data

if __name__ == "__main__":
    uvicorn.run(app, host="127.0.0.1", port=8000)
具体来说,20 个请求同时请求,这 20 个请求在 4 种写法的结果如下:(其中第2种堵住了自带线程池的结果最出乎意料)
阅读更多…有一个第三方的包,在运行时会打出大量我觉得没有用的日志,假设它都以abcdef开头,要怎么办呢?一般的 log 过滤,都是按等级来设置的,例如不记录 debug、info 级别的 log。如果涉及到字符串的匹配,要怎么做?
做法是在logback.xml的<appender>里面,加上<filter>:
<appender name="FILE" class="ch.qos.logback.core.rolling.RollingFileAppender">
    <encoder>
        <pattern>%d{yy-MM-dd HH:mm:ss.SSS} [%thread] %-5level %logger{32} - %msg%n</pattern>
        <charset>UTF-8</charset>
    </encoder>

    <filter class="com.xxxxxxx.MyThresholdFilter"/>  <!-- 加在这里 -->
</appender>
然后另外再创建这个MyThresholdFilter.java:
public class MyThresholdFilter extends ThresholdFilter {
    @Override
    public FilterReply decide(ILoggingEvent event) {
        if (event.getMessage().startsWith("abcdef")) {
            return FilterReply.DENY;
        }
        return FilterReply.NEUTRAL;
    }
}
这个问题是我最近迁移本网站时遇到的。
本网站是 Docker + PHP-FPM + nginx,迁移后,Wordpress 的 .php 访问报错:Failed opening required /xxx/wp-config.php
很明显就是容器里没有权限。那么为什么会没权限呢?
很久没搞这个的部署,忘得差不多了。经过重温与找资料,大概是这样解决的,不一定是完美的方案:
www-data用户(并且uid=33),属于www-data用户组(且gid=33)www-data,且 33 号的 uid/gid 是否被占用:# cat /etc/group# cat /etc/passwd# groupmod -g 34 tapewww-data用户组:# groupadd -g 33 www-datawww-data用户,不创建home目录(-M),设置默认shell(-s)为nologin:# useradd -M -u 33 -g www-data -s /usr/sbin/nologin www-datawww-data用户,在自带的机器上,passwd文件是这样的:# cat /etc/passwd | grep www-datawww-data:x:33:33:www-data:/var/www:/usr/sbin/nologinwww-data:x:33:33::/home/www-data:/usr/sbin/nologinwww-data:# chown -R www-data:www-data some_directory这个需求不是很常用,但需要用时,在网上不是很好搜索到,故在此记录。
例如,要表示“每月的第二个星期六的12:34:00”,是这样写:
0 34 12 ? * SAT#2注意,这个不是标准的形式,不是所有所有程序都接受这样的格式。一般程序都会有校验功能,可以检查下次执行的时间来进行确认。(第一是”?”表示不指定不一定支持,第二是”SAT”不一定支持,第三是”#2″更不一定支持)
有一个项目升级到 Spring Boot 3.0,同事踩坑填坑花了点时间。遇到最大的一个坑就是 swagger 了,我顺便记录一下。
可以去它的官网看,SpringFox 已经有两三年没有更新了,属于被遗忘的项目。我去年也遇到 SpringFox 的问题,当时我用 Spring Boot 2.6,已经出现了不兼容报错的情况,所以退回了 2.5。今年是 Spring Boot 3.0,SpringFox 直接就别用了。
SpringDoc 可以自动化生成 API 文档,它支持:(注意,本文所指均是 SpringDoc v2 版本)
把原来的io.springfox、swagger 2相关的依赖都删除,然后添加 SpringDoc 的依赖:
<dependency>
   <groupId>org.springdoc</groupId>
   <artifactId>springdoc-openapi-starter-webmvc-ui</artifactId>
   <version>2.1.0</version>
</dependency>
把原来 swagger 2 的注解替换成 swagger 3 的,springdoc-openapi-starter-webmvc-ui中已经包含了 swagger 3 的依赖。
@Api → @Tag@ApiIgnore → @Parameter(hidden = true) 或 @Operation(hidden = true) 或 @Hidden@ApiImplicitParam → @Parameter@ApiImplicitParams → @Parameters@ApiModel → @Schema@ApiModelProperty(hidden = true) → @Schema(accessMode = READ_ONLY)@ApiModelProperty → @Schema@ApiOperation(value = "foo", notes = "bar") → @Operation(summary = "foo", description = "bar")@ApiParam → @Parameter@ApiResponse(code = 404, message = "foo") → @ApiResponse(responseCode = "404", description = "foo")之后 swagger 就可以在 http://server:port/context-path/swagger-ui.html 访问了。
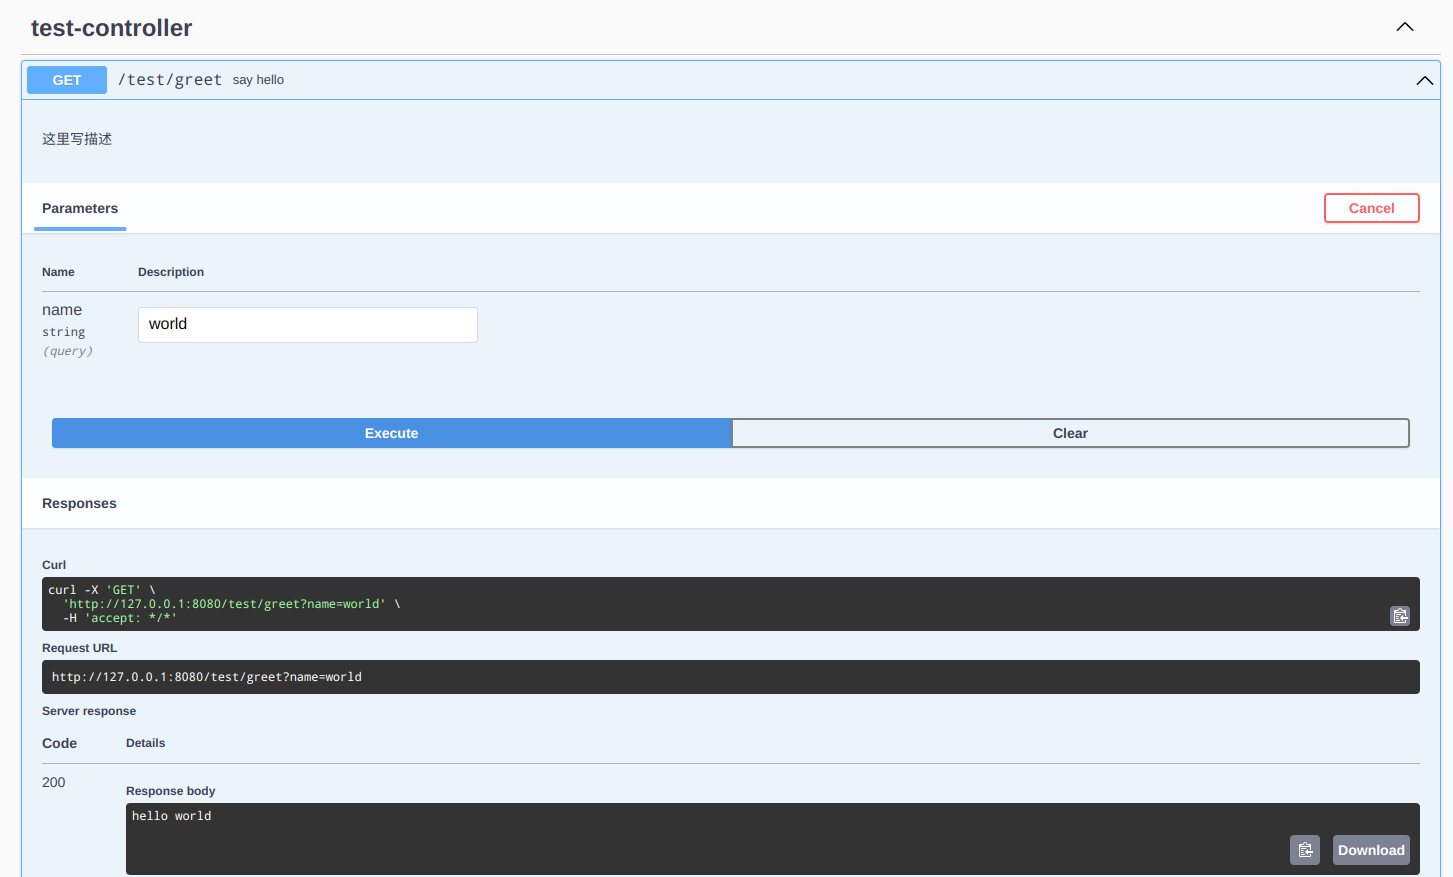
创建一个 controller:
@RestController
@RequestMapping("/test")
public class TestController {

    @GetMapping("/greet")
    @CrossOrigin
    @Operation(summary = "say hello", description = "这里写描述")
    public String greet(@RequestParam(required = false) String name) {
        return "hello " + name;
    }
}
访问 swagger 大概是这样:
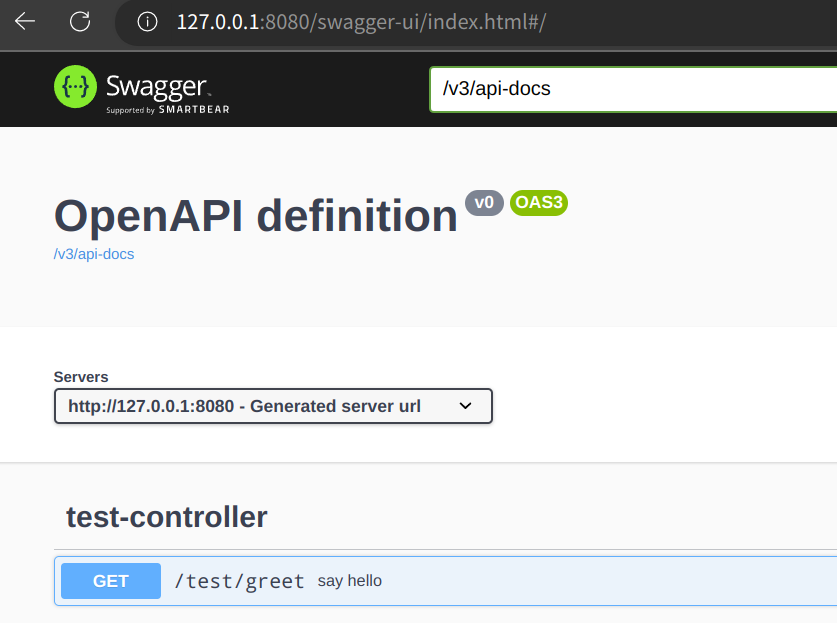
具体的接口:
上面只展示了最简单的使用,高级的用法和具体的配置在这里先不展开,需要时自己看官网文档。
一个 Pod 创建之后,Service 马上就能选择它,并且请求也有可能转发到这个 Pod。然而,Pod 的启动很可能是需要时间的,在启动、加载、预热的过程中,如果有请求转发进来,这个请求很可能会失败。
K8S 处理这个问题的办法是引入了就绪探针(Readiness Probe),readiness 这个词的词根不是“read”,而是“ready”,就是说这个 Pod ready 了没有。如果没 ready,请求就不转发给它;ready 之后,就可以转发给它。
综合运用 Liveness Probe 和 Readiness Probe,可以让服务的自愈、启动、重启、升级更得心应手。
就绪探针怎么判断 Pod 是否就绪?和存活探针(Liveness Probe)一样,常用的有 httpGet 和 exec 两种方式。
顾名思义,K8S 通过发送 HTTP GET 请求,判断 Pod 是否就绪。若该请求收到 HTTP 2xx~3xx 状态码均判断为成功。下面是例子:
apiVersion: apps/v1
kind: Deployment
metadata:
  name: nginx
spec:
  replicas: 3
  selector:
    matchLabels:
      app: nginx
  template:
    metadata:
      labels:
        app: nginx
    spec:
      containers:
      - image: nginx:latest
        name: container-0
        readinessProbe:
          httpGet:
            path: /health
            port: 8080
            scheme: HTTP           # 还可以是HTTPS
          initialDelaySeconds: 60  # 容器启动后要等待多少秒后探针才开始,默认是0秒,最小值是0
          timeoutSeconds: 10       # 探测超时的阈值。默认值是1秒。最小值是1
          periodSeconds: 30        # 每次执行探测的时间间隔(单位是秒)。默认是10秒。最小值 1
          successThreshold: 1      # 视为成功的最小连续成功次数。默认值是1。存活和启动探测的该值必须是1。最小值是1
          failureThreshold: 3      # 视为失败的最小连续失败次数。默认值是3。最小值是1
还可以通过 linux 命令的方式来判断,若 error code = 0,则表明命令正常。
apiVersion: v1
kind: Pod
metadata:
  labels:
    test: liveness
  name: liveness-exec
spec:
  containers:
  - name: liveness
    image: registry.k8s.io/busybox
    args:
    - /bin/sh
    - -c
    - touch /tmp/healthy; sleep 30; rm -f /tmp/healthy; sleep 600
    readinessProbe:
      exec:
        command:
        - cat
        - /tmp/healthy
      initialDelaySeconds: 5
      periodSeconds: 5
上面这个例子中,每 5s 会cat /tmp/healthy一次,30s 后该文件被删除,cat /tmp/healthy就会失败。